
Changing silicone molding suppliers does not always mean building a new mold.
If you already own a production mold, it may be possible to transfer the existing tool from the current supplier to a new silicone manufacturer.
This can potentially save:
- new tooling cost;
- mold development time;
- repeated sampling;
- duplicated engineering work.
However, a mold transfer is not as simple as putting the tool into a wooden crate and shipping it to another factory.
Before production can restart, the new manufacturer needs to understand:
- who owns the mold;
- how the mold was designed;
- what machine it originally ran on;
- which silicone material was used;
- the approved molding parameters;
- current mold condition;
- dimensional history;
- maintenance history;
- previous quality problems.
A poorly managed mold transfer can create:
- unexpected flash;
- dimensional changes;
- longer cycle times;
- poor filling;
- demolding problems;
- inconsistent production.
This guide explains how buyers should transfer an existing silicone mold from one supplier to another and what information should be collected before the mold leaves the original factory.
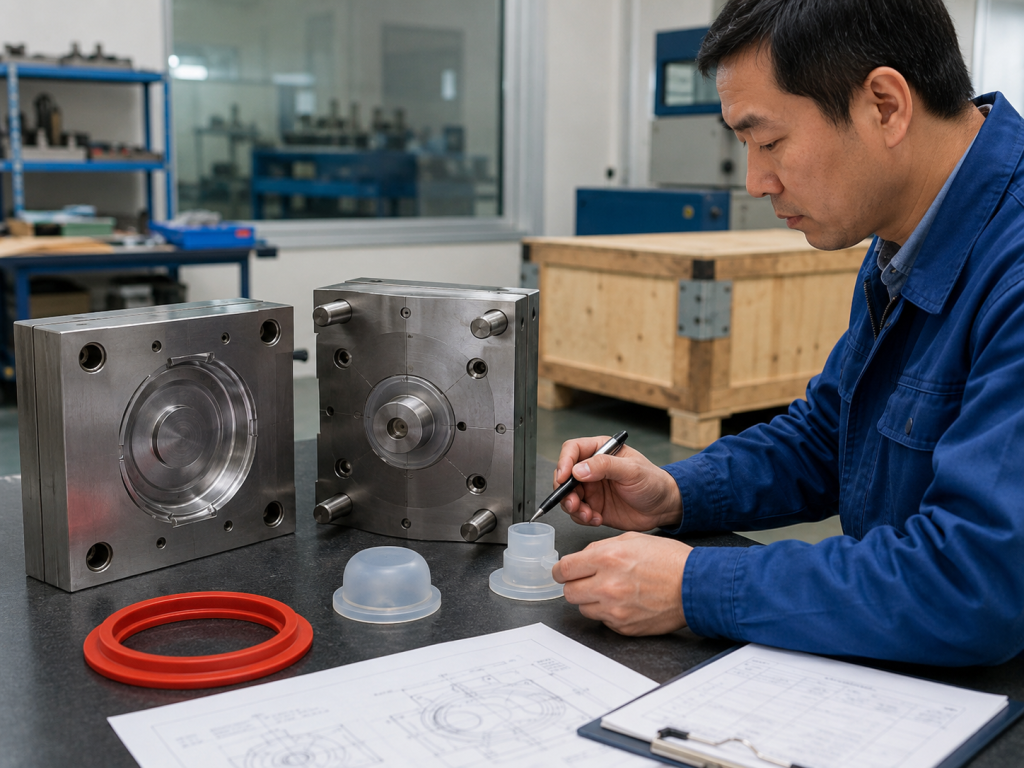
Why Do Buyers Transfer Silicone Molds?
There are many reasons a company may want to change silicone molding suppliers.
Common situations include:
- repeated quality problems;
- unstable dimensions;
- excessive flash;
- late deliveries;
- poor communication;
- rising production prices;
- supplier capacity limitations;
- factory closure;
- change in sourcing strategy;
- geographic supply-chain changes.
Sometimes the product itself is performing well, but the commercial relationship is no longer suitable.
If the existing mold is still in good condition, transferring it may be more economical than manufacturing an entirely new tool.
First Question: Who Owns the Mold?
Before discussing logistics, confirm the legal ownership of the tooling.
This should ideally have been defined when the original mold was purchased.
The tooling agreement or purchase order may specify:
- buyer-owned mold;
- supplier-owned mold;
- shared tooling investment;
- tooling amortized into unit price.
Do not assume that paying a “tooling fee” automatically means the mold can be removed from the supplier’s factory.
Current industry guidance recommends defining mold ownership, storage responsibilities, maintenance and transfer procedures before tooling begins because these terms directly affect whether a tool can later be moved to another manufacturer.
Before arranging a transfer, confirm in writing:
Who legally owns the mold?
Does the buyer have the right to remove it?
Are any unpaid tooling or maintenance charges outstanding?
Check the Original Tooling Agreement
Review documents including:
- tooling purchase order;
- mold development agreement;
- supplier contract;
- quotation;
- tooling invoice;
- NDA;
- manufacturing agreement.
Look specifically for clauses covering:
- tooling ownership;
- storage;
- maintenance;
- repair;
- intellectual property;
- removal rights;
- transfer fees.
If ownership is unclear, resolve the commercial issue before arranging transportation.
What Should Be Transferred With the Silicone Mold?
The physical mold is only part of the manufacturing package.
Ideally, the buyer should obtain a complete tooling transfer package.
This may include:
Physical Mold
The complete production tool.
Mold Drawing
Tool assembly drawing showing:
- mold dimensions;
- plates;
- inserts;
- cores;
- guide pins;
- runners;
- gates.
3D Mold Data
Where available.
Product CAD
The current approved production revision.
Product 2D Drawing
Including current tolerances.
Mold Maintenance Records
Notamment :
- repairs;
- insert replacements;
- polishing;
- welding;
- wear issues.
Molding Parameter Sheet
Including the process conditions used to produce the approved parts.
Material Specification
Exact silicone grade and hardness.
Approved Samples
Golden samples or limit samples.
Inspection Reports
Especially reports for critical dimensions.
The more information that moves with the mold, the easier it is for the new supplier to reproduce the existing production process.
Do Not Transfer Only the Mold
One of the most common mistakes during supplier changes is transferring only the physical steel tool.
The new factory receives a mold but does not know:
- which silicone was used;
- what mold temperature was required;
- how long the cure cycle was;
- where flash historically occurred;
- which cavities had dimensional corrections;
- how the parts were demolded.
The result is unnecessary trial and error.
The objective of a mold transfer should be:
Transfer the manufacturing knowledge, not only the steel.
1. Confirm Mold Dimensions
Before accepting the transferred tool, the new manufacturer should know:
- overall mold length;
- width;
- height;
- total weight.
This determines whether the mold fits available equipment.
A mold physically too large for the new supplier’s molding machine cannot simply be installed.
2. Confirm Machine Compatibility
The mold must be compatible with the new production equipment.
The new manufacturer should review:
- machine platen dimensions;
- tie-bar spacing;
- mold thickness;
- clamping requirements;
- heating method;
- electrical connections;
- hydraulic connections;
- runner interface.
This is especially important when moving a tool between factories using different equipment brands or machine sizes.
A mold that fits one factory’s equipment may require modification before it can run efficiently elsewhere.
Compression Mold Transfer
Compression molds may sometimes be relatively straightforward to transfer.
However, the new factory should still confirm:
- mold dimensions;
- heating requirements;
- press capacity;
- mold opening method;
- demolding procedure.
The original production process may also depend heavily on:
- preform weight;
- material placement;
- cure time;
- temperature;
- pressure.
These processing details should be transferred whenever possible.
LSR Injection Mold Transfer
Liquid Silicone Rubber injection molds can require significantly more compatibility review.
An LSR mold may include:
- cold-runner systems;
- precision nozzles;
- vacuum systems;
- temperature-control circuits;
- automated demolding;
- special gate systems.
The new supplier should therefore verify compatibility with:
- LSR dosing equipment;
- injection unit;
- mold temperature control;
- vacuum equipment;
- machine interface;
- automation.
An LSR mold should not be shipped before this technical review has been completed.
3. Confirm Silicone Material
Ask the existing supplier for the exact production material.
The information should ideally include:
- manufacturer;
- material grade;
- Shore hardness;
- color;
- curing system.
Do not simply record:
Silicone 50 Shore A
Two 50 Shore A silicone materials can behave differently during molding.
Differences may include:
- shrinkage;
- viscosity;
- curing characteristics;
- tear strength;
- demolding behavior.
Changing material during a mold transfer can create dimensional differences even if the mold itself remains unchanged.
Keep the Same Material During Initial Validation
When possible, the safest initial approach is:
Same Mold + Same Silicone Material + Same Product Drawing
This reduces the number of variables during the transfer.
Once the new factory proves that it can reproduce the approved product, alternative materials or process optimization can be evaluated separately.
Changing:
- factory;
- machine;
- silicone grade;
- curing conditions
at the same time makes troubleshooting much more difficult.
4. Obtain the Existing Process Parameters
Ask the current supplier for the production process sheet if contractually available.
Useful information may include:
- molding temperature;
- cure time;
- injection pressure;
- injection speed;
- vacuum settings;
- mold opening sequence;
- post-curing conditions.
For compression molding, also consider:
- material charge weight;
- preform shape;
- material position;
- compression conditions.
Process parameters from the original factory will not always transfer directly to different equipment.
However, they provide the new manufacturer with a valuable starting point.
5. Inspect the Mold Before Shipping
Do not assume the mold is in perfect condition simply because production has been running.
Before transfer, inspect for:
- corrosion;
- damaged cavity surfaces;
- worn guide pins;
- damaged shut-offs;
- worn parting surfaces;
- damaged vents;
- gate wear;
- scratches;
- repaired areas;
- welded surfaces.
For older molds, also check:
- dimensional wear;
- cavity-to-cavity variation;
- loose inserts.
Ideally, the mold condition should be photographed and documented before shipment.
Create a Mold Condition Report
A simple transfer inspection report can include:
| Article | Condition |
|---|---|
| Mold Base | Good / Repair Required |
| Cavity Surface | Good / Worn |
| Core Inserts | Good / Repair Required |
| Guide Pins | Good / Worn |
| Parting Surface | Good / Damaged |
| Évacuation | Clean / Blocked |
| Gate | Good / Worn |
| Cold Runner | Good / Service Required |
| Corrosion | None / Present |
| Mold Identification | Confirmed |
Add photographs of important areas.
This establishes the condition before transportation.
6. Review Mold Maintenance History
Ask:
How many production cycles has this mold completed?
A mold with:
20,000 cycles
and one with:
2,000,000 cycles
may require very different levels of maintenance before restarting production.
Useful maintenance information includes:
- last major service date;
- insert replacements;
- welding repairs;
- polishing history;
- guide component replacement;
- recurring flash locations.
If maintenance records do not exist, the new supplier should perform a more thorough inspection.
7. Review Existing Quality Problems
A supplier change is often triggered by a quality problem.
Do not hide these problems from the new factory.
Par exemple :
Cavity 3 frequently produces excessive flash.
Sealing OD gradually moves toward the upper tolerance limit.
Part tears during demolding approximately 2% of the time.
This information helps the new manufacturer distinguish between:
- process problems;
- material problems;
- mold problems.
Otherwise, the same defects may continue after the transfer.
8. Transfer Approved Samples
Approved physical samples can be extremely useful.
Send the new supplier:
- golden samples;
- boundary samples;
- recent production samples.
They help establish expectations for:
- surface finish;
- flash;
- gate marks;
- color;
- flexibility;
- appearance.
For cosmetic silicone products, physical reference samples may communicate acceptance criteria more clearly than drawings alone.
9. Transfer Inspection Data
Provide historical dimensional reports if available.
Especially important are:
- critical dimensions;
- sealing dimensions;
- insert positions;
- hole positions;
- wall thickness.
Historical data helps identify dimensions that have been:
- stable;
- close to tolerance limits;
- difficult to control.
The new manufacturer can then prioritize those characteristics during the transfer trial.
10. Confirm Product Drawing Revision
Before the mold leaves the original supplier, make sure everyone is using the same product revision.
Par exemple :
Revision A
may have been the original tooling design.
But production may currently use:
Revision C
after two engineering changes.
The new factory must receive:
- current CAD;
- current drawing;
- current specifications.
Otherwise, the supplier may evaluate the mold against an obsolete design.
11. Verify Mold Identification
Every transferred mold should have a clear identification.
Ideally, record:
- mold number;
- product number;
- revision;
- cavity count.
This becomes particularly important when several similar tools are stored at the same factory.
Take photographs before packaging.
12. Clean the Mold Before Transportation
Before shipping, the mold should normally be cleaned.
Remove:
- silicone residue;
- dirt;
- oil contamination;
- loose debris.
Cleaning allows the receiving manufacturer to perform a more accurate condition inspection.
13. Protect the Mold Against Corrosion
A production mold is a precision tool.
It should not be shipped like ordinary metal freight.
Depending on tooling material and transportation conditions, protection may include:
- rust-preventive oil;
- protective wrapping;
- moisture barrier;
- desiccant;
- sealed packaging.
Cela est particulièrement important pour :
- sea freight;
- humid climates;
- long storage periods.
A mold that develops corrosion during transfer may require polishing or repair before production.
14. Use Suitable Export Packaging
Large production molds are heavy.
Transport packaging should prevent:
- movement;
- impact;
- moisture exposure.
Typical shipment preparation may include:
- strong wooden crate;
- internal securing;
- corrosion protection;
- lifting instructions.
The mold weight and lifting points should be communicated to both the logistics company and receiving factory.
15. Insure High-Value Tooling During Shipment
Production molds can represent significant capital investment.
For valuable tooling, consider appropriate transport insurance.
Document the mold’s condition before shipment so any transportation damage can be distinguished from pre-existing wear.
What Happens When the New Factory Receives the Mold?
The new manufacturer should not immediately begin mass production.
The correct sequence is normally:
Incoming Inspection → Mold Setup → Trial Molding → Measurement → Correction → Approval → Production
16. Perform Incoming Tooling Inspection
After the mold arrives, the new manufacturer should inspect it again.
Compare the mold against the pre-shipment condition report.
Vérifier :
- parting surfaces;
- cavities;
- guide components;
- gates;
- vents;
- runner system;
- inserts.
This helps identify any damage that occurred during transportation.
17. Check Mold Compatibility Again
The receiving factory should physically confirm:
- machine fit;
- mounting;
- connections;
- mold opening;
- runner interface.
Small compatibility issues sometimes become obvious only after the mold is physically installed.
18. Run a Mold Trial
The first run at the new factory should be treated as a validation trial, not ordinary production.
The objective is to determine whether the transferred tool can reproduce acceptable parts using the new factory’s:
- equipment;
- material handling;
- operators;
- process controls.
Start with the original production parameters where appropriate and then optimize carefully.
19. Perform First Article Inspection
After the initial trial, measure the molded samples against the current approved drawing.
A structured First Article Inspection should focus on the agreed critical dimensions and quality requirements before normal production is released. Current supplier-onboarding guidance similarly recommends establishing measurable acceptance criteria and an FAI process before production approval.
Vérifier :
- dimensions;
- hardness;
- appearance;
- flash;
- gate mark;
- insert position.
For sealing products, functional testing may also be required.
20. Compare Old and New Production Samples
Whenever possible, compare:
Last Approved Part From Old Supplier
with:
First Trial Part From New Supplier
Check for differences in:
- dimensions;
- appearance;
- texture;
- hardness;
- flash;
- parting line;
- gate vestige;
- flexibility.
The goal is not necessarily to make both parts visually identical under magnification.
The goal is to confirm that the transferred process meets the approved product specification.
21. Expect Some Process Adjustment
The new factory may use:
- a different molding machine;
- different temperature-control equipment;
- different production environment.
Therefore, the exact original processing parameters may not produce identical results.
Optimization may be necessary.
This does not automatically mean the mold is defective.
The new manufacturer may need to adjust:
- temperature;
- curing time;
- pressure;
- vacuum;
- demolding.
The important requirement is that final production remains within the approved specification.
22. Possible Mold Modifications After Transfer
Sometimes a mold must be modified before stable production can begin.
En voici quelques exemples :
- new mounting holes;
- new locating features;
- connector changes;
- nozzle interface modification;
- vent cleaning;
- gate repair;
- cavity polishing.
Older tools may also require:
- guide pin replacement;
- shut-off repair;
- insert replacement.
These costs should be identified before mass production begins.
Who Pays for Mold Transfer Modifications?
This should be agreed commercially.
Possible situations include:
New Supplier Compatibility Modification
Required because the receiving factory uses different equipment.
Existing Mold Damage
Required because the tool is worn or damaged.
Engineering Change
Required because the buyer changed the product.
These are different causes and should not automatically be treated as the same responsibility.
Ask the new supplier to provide a written mold evaluation before approving modification work.
23. Revalidate Critical Dimensions
Never assume dimensional results will remain identical after the factory changes.
Silicone dimensions can be influenced by:
- material lot;
- machine;
- mold temperature;
- curing;
- post-curing;
- measurement method.
Critical dimensions should therefore be revalidated after transfer.
24. Revalidate Flash Requirements
Flash can change after transfer because of differences in:
- mold clamping;
- process pressure;
- mold maintenance;
- machine condition.
Check especially:
- sealing surfaces;
- holes;
- valve edges;
- cosmetic surfaces.
A tool that produced acceptable flash at the original supplier may require adjustment at the receiving factory.
25. Revalidate Post-Curing
If the product requires post-curing, confirm that the new factory uses the approved:
- temperature;
- duration;
- oven process;
- handling method.
Post-curing differences can potentially affect final silicone dimensions and properties.
26. Approve Samples Before Mass Production
Do not allow a transferred mold to move directly from shipping crate into unrestricted production.
Use a defined approval sequence:
Incoming Mold Inspection
↓
Trial Run
↓
Contrôle dimensionnel
↓
Tests fonctionnels
↓
Sample Approval
↓
Pilot Production
↓
Mass Production
This reduces the risk of receiving a large quantity of unacceptable parts.
Should You Transfer the Old Mold or Build a New One?
Sometimes transferring the existing mold is not the best solution.
Consider building a new mold if:
- the old tool is heavily worn;
- drawings are unavailable;
- the tool is incompatible with new machines;
- the product design has changed significantly;
- mold ownership is disputed;
- repair cost is close to new tooling cost.
Before deciding, ask the new manufacturer to compare:
Transfer + Repair Cost
versus:
New Mold Cost
Example Decision
Suppose an existing silicone mold is eight years old.
The new supplier finds:
- worn parting surfaces;
- damaged cavity insert;
- outdated runner system;
- several welded repairs.
Transfer and refurbishment may cost:
60–80% of a new mold
In this situation, building a new production tool may offer better long-term economics.
Now consider a two-year-old mold with:
- good cavity surfaces;
- low cycle count;
- complete drawings;
- compatible machine size.
Transferring this tool may save substantial time and investment.
Silicone Mold Transfer Checklist
Before the mold leaves the existing supplier, confirm:
- mold ownership;
- transfer authorization;
- current CAD revision;
- current 2D drawing;
- mold assembly drawing;
- cavity count;
- mold dimensions;
- mold weight;
- machine compatibility;
- silicone material grade;
- Shore hardness;
- process parameters;
- post-curing conditions;
- maintenance history;
- repair history;
- existing quality problems;
- approved samples;
- inspection reports;
- mold condition photographs;
- mold identification;
- corrosion protection;
- shipping crate.
After the mold reaches the new manufacturer, confirm:
- incoming inspection;
- transport damage check;
- machine installation;
- mold trial;
- process optimization;
- FAI;
- flash inspection;
- functional validation;
- approved production samples.
Information to Send the New Silicone Manufacturer
A useful transfer package may look like this:
Product: Joint d'étanchéité en silicone pour connecteur
Tool Number: SM-2024-015
Tool Ownership: Customer-Owned
Procédé de moulage : Moulage par injection de LSR
Cavities: 4
Matériau : Platinum-Cured LSR
Dureté : 50 ±5 Shore A
Couleur : Noir
Annual Volume: 300,000 pcs
Critical Dimension: Sealing OD 18.00 ±0.10 mm
Flash Requirement: No loose flash on sealing surface
Existing Issue: Cavity 3 shows higher flash than other cavities
Documentation Available:
- STEP file;
- PDF drawing;
- mold drawing;
- latest inspection report;
- approved sample;
- process parameter sheet.
This gives the receiving factory a much better starting point than simply sending the mold.
Common Mold Transfer Mistakes
Transferring Before Ownership Is Confirmed
Resolve tooling ownership first.
Shipping Without a Condition Report
Damage disputes become difficult to resolve later.
Changing Silicone Material Immediately
Maintain the original material during initial validation whenever possible.
Not Sending Approved Samples
The new factory loses an important quality reference.
Assuming the Mold Fits Any Machine
Machine compatibility must be checked before shipment.
Skipping First Article Inspection
A factory change means the manufacturing process has changed.
Critical characteristics must be revalidated.
Moving Directly Into Mass Production
Always conduct trial and approval first.
How to Make Future Mold Transfers Easier
The best time to prepare for a future transfer is when the mold is originally purchased.
Tooling agreements should clearly define:
- ownership;
- mold identification;
- storage;
- maintenance;
- transfer rights;
- documentation ownership.
Procurement guidance increasingly recommends making mold ownership and transfer expectations explicit in the original quotation because missing transfer terms can later become a significant sourcing risk.
Buyers should also retain copies of:
- product CAD;
- mold drawings where contractually included;
- approved samples;
- inspection reports;
- material specifications.
Do not allow all project knowledge to exist only inside one supplier’s factory.
Conclusion
Transferring a silicone mold to a new manufacturer can save the cost and time of building a completely new tool, but the transfer must be managed as an engineering project rather than a simple logistics shipment.
The most important steps are:
confirm ownership → collect documentation → inspect the mold → verify machine compatibility → protect the tool during shipping → trial mold → perform FAI → approve production.
The most valuable item being transferred is not only the steel mold.
It is the complete manufacturing package:
tooling + CAD + material + process knowledge + inspection data + approved samples.
When these items are transferred together, a new silicone manufacturer has a much better chance of reproducing stable production quickly.
If the existing mold is heavily worn, poorly documented or incompatible with the new factory’s equipment, building a new mold may ultimately be more economical.
For this reason, buyers should ask the receiving manufacturer to complete a formal mold transfer evaluation before committing the next production order.
FAQ
Can I move my silicone mold to another manufacturer?
Yes, if you own the tooling and the commercial agreement allows the mold to be transferred. Confirm ownership and transfer rights before arranging transportation.
Can the new supplier immediately use my existing silicone mold?
Not always. The supplier must first confirm mold size, machine compatibility, runner system, heating requirements and other interfaces. Some molds require modification before they can run on different equipment.
What documents should be transferred with a silicone mold?
Ideally provide the current product CAD, 2D drawing, mold drawings, material specification, molding parameters, maintenance history, inspection reports and approved samples.
Should I use the same silicone material after transferring the mold?
For initial validation, keeping the same material is usually the lowest-risk approach. Changing the factory and material simultaneously introduces additional variables that make troubleshooting more difficult.
Do I need new samples after transferring the mold?
Yes. The receiving manufacturer should conduct a trial molding run and provide new samples for dimensional, cosmetic and functional approval before mass production.
What if the transferred mold is damaged or worn?
The new manufacturer should issue a tooling-condition report and identify recommended repairs. Compare the transfer-and-repair cost with the cost of manufacturing a new mold before deciding how to proceed.
 English
  Japanese
  Korean
  German
  French
  Italian
  Spanish
  Dutch
Dutch  Chinese
  Portuguese
  Polish
  Czech
Czech  Hungarian
  Swedish
  Finnish
  Vietnamese
  Thai
Thai  Turkish
  Arabic
  Russian